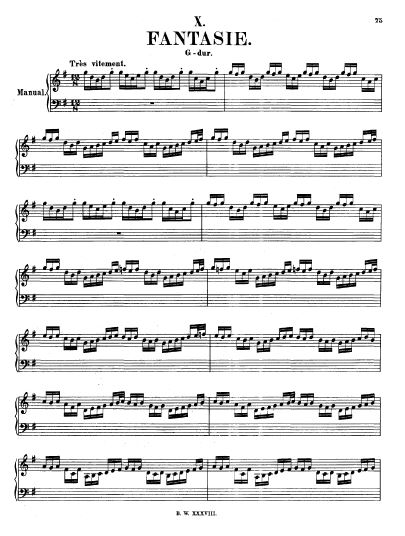
 Pièce d'Orgue in G, BWV 572, also known as Fantasia in three parts, is written in a French style. It originated rather early in Bach's career (before 1712). The first part is entitled as Tres vitement (very fast), the second - Gravement (heavy) and the final part - Lentement (slow).
Because of fast runs and passages, the opening and closing parts remind of a toccata, and the central solemn episode is written in a 5 part polyphonic texture. In this article I will give tips and advice on how to play and practice this wonderful composition. The Italians would call the opening section the Passagio which was also a common feature in the North German Praeludia. However, it is questionable whether the Italian term is appropriate in the French style composition. Basically it is a virtuosic episode written in a monophonic texture where we can find both the elements of arpeggio and scale-based passages. At any rate, even at this early stage of Bach's career, the composer shows a unique angle of blending multi-cultural elements in one work. Although written in deceptively simple and clear one-voice texture, the opening section has various potential dangers for an organist. This includes note grouping and articulation. Note groupings have something to do with the meter signature which is 12/8. Such a meter has 4 relatively accented beats (on sixteenths 1, 7, 13, and 19, or if we count the eighth notes – 1, 4, 7, and 10). In a measure of such a meter, there are four groups of sixteenth notes. Each group has 6 notes. However many sixteenths are grouped not by the meter requirements, but according to which hand has to play them. For example, in measure 2, the sixteenths are grouped in threes for the right hand and left hand respectively. If we play and make accents according to such a grouping, then inevitably the listener will have the feeling of triplets which is not the correct way to play this passage. Instead, the organist should try to make very gentle accents on every other note and emphasize beats 1, 4, 7, and 10 of the measure. Concerning the articulation, articulate legato touch should be used which was the traditional way of playing any instrument in the Baroque period. Articulate legato means that there should be very small distances between each and every note. However, this does not mean, that the musical passage should be choppy and very detached. On the contrary, the organist should strive to have a Cantabile or singing manner of playing where the notes are connected into one line. However, playing with articulate legato touch in such a lively tempo is not exactly easy. Try to keep all your fingers in contact with the keys at all times. Practice in a slow tempo and with correct articulation. Rhythmically lean on the places where there are important changes of harmony (before measures 17, 21, and 27). Slow down before reaching the end of this section so that you could naturally connect it with the next central section. In the longest main central section, we can hear very imposing stepwise rising theme in long note values which is treated in a fugal manner in various voices. This is a typical French 5 part texture, because the French employed 5 stringed instruments in an ensemble (2 violins, 2 violas, and a violon). Therefore, many of the French classical type of compositions are written in this texture as well (especially the fugues). By the way, can you guess what kind of ominous chord sounds at the end of this section? This central section raises various performance difficulties for many organists. Notice that the meter signature is alla breve or cut-time. That means that there are really two beats per measure and the first is strong and the second is weak. The harmony also changes mostly twice per measure. We have to be aware of that and emphasize rhythmically various important harmonic changes, especially occurring in cadences. Apparently for Bach this central section was like a case study in suspensions. Just look at any measure you want and you will see tied notes over the bar lines. The suspension technique gives a constant feeling of tension and continuity. Most of the cadences in this section are deceptive. That means whenever Bach ends a fragment in one key, he does not use chords of the Dominant and Tonic but rather Dominant and the chord of 6th scale degree. Try to emphasize rhythmically these cadences. Such an approach will help you to clarify formal structure of this section. Because this section is written in 5 independent voices, there is an inherent danger that the organist will not be able to listen to each separate line, everything will just sound legato, and correct articulation will be lost. In other words, it is easy to understand that all the notes should be played with articulate legato touch but the suspensions over the bar line make it exceedingly difficult to control the releases. If you truly want to have a precise articulation, my suggestion would be to take a fragment of four measures and practice each of the 5 voices separately, then combinations of 2 voices, 3 voices, 4 voices, and only then practice playing the entire 5 part texture. Then take another fragment of 4 measures etc. Practicing this way will ensure that your articulation will be unbeatable and that you will hear each part separately which you have to strive for in every polyphonic composition. Pièce d'Orgue ends with a virtuosic but a little slower and heavier texture which has 5 voices encoded: 4 voices could be perceived in both hands and magnificent Dominant pedal point in the pedal line. Try not to play this final section too fast because it has a tempo marking Lentement. Like in the opening section, here too, the notes are grouped according to which hand plays which of the three note groups. When you play them, instead of emphasizing two groups of triplets, try to feel three groups in each sextuplet. Make a natural connection between the hand part and the magnificent long Dominant pedal point in the middle of the measure 200. Because this is the French style piece, the ornaments also should be performed in such a tradition. Always start the trills and mordents from the upper note. By the way, it is worthwhile looking at the heavily ornamented version of the middle section in the Neue Bach Ausgabe edition (Volume 7 of Bach Organ Works ). You can try to adapt many of the ornaments in your performance, too. The most trusted registration of this piece obviously would be Principal chorus or Organo Pleno (with or without 16’ in the manuals). Manuals could be coupled as well. The use of the deep pedal reeds, such as Posaune 16’ (or 32’ if there is one on your instrument) is most welcome. If you use a modern instrument with unnaturally sharp sound mixtures, sometimes it is a good idea to add some additional 8’ and 4’ flutes in the manuals for thickness. Feel free to play on the secondary manual in the opening section, if you wish. In this case, avoid using 16' in your opening registration. That way you will achieve the true gravity which Bach wished for his Pleno sound. I have created BWV 572 Video Training which will help you master Bach's Piece d'Orgue. Overall, this is a rather difficult composition to play. If you are new to the organ, I suggest you start with shorter free works, such as 8 Short Preludes and Fugues for organ earlier attributed to J.S.Bach and leave the Piece d’Orgue for the future. At any rate, even an experienced performer should have much perseverance and attention to detail while practicing this wonderful work. Memorizing the piece would give the organist a full mastery at a much deeper level.
Comments
The Prelude and Fugue in C major, BWV 553 is included in the collection of 8 Short Preludes and Fugues formely attributed to J.S.Bach. Although the author of this piece remains unknown it is generally reffered as a composition of the Bach circle, possibly by Johann Ludwig Krebs.
This popular work can be played on the organ in these 8 easy steps. 1. Analyze the form and tonal plan of the piece. Play this composition a couple of times so that you could understand the structure of the prelude and fugue. The prelude is in a binary form, which means that it consists of two parts, each of them repeated. The first part ends with the cadence in the key of G major, which is the Dominant of C major. The second part also has a cadence in A minor, and ends in C major. When analyzing the fugue, count the appearances of the subject or the theme. Note the keys that the theme is in. 2. Write in fingering and pedaling. Playing with correct fingering and pedaling has many advantages, it gives you much precision and clarity. Therefore, when you discover some trouble spots in the music, it is best to write in the correct fingering so that you will never have to think about it again. I recommend writing in the pedaling on every note. Use alternate toe technique and avoid using heels. 3. Make sure the articulation is precise. Once you have fingering and pedaling in place, you have to decide on the correct manner of articulation. In the Baroque period, the normal way of articulating notes was so-called ordinary touch or articulate legato. This means that the notes in the piece must be somewhat detached. However, they should be played in a singing or cantabile manner. 4. Decide on ornamentation. The trills in this piece should be played from the upper note. Although there are only one trill noted in the prelude and three in the fugue, you should feel free to add similar ornaments in every structurally inportant place of the piece. In other words, the trills can be played in every cadence. 5. Decide on tempo. The normal tempo in this piece should be somewhere around 80 in the metronome. However, for practicing purpose use much slower tempo. Always try to feel the strong and week beats of the measure. 6. Decide on registration. The registration for this prelude and fugue should be Organo pleno, or principal chorus with or without 16‘ in the manuals. On some modern organs with very screamy mixtures, this registration works best if you add 8‘ and 4‘ flutes. 7. Practice the piece. When practicing this prelude and fugue, you can work in fragments of 4 measures or even shorter. When these fragments become easy, combine the fragments and practice longer episodes. However, whenever you make any mistake, go back a measure or two, correct it and play this fragment a few times. 8. Memorize the piece (optional). Although memorization is not required, you will play with greater confidence if you know the piece from memory. These are the steps necessary to play and learn this composition. If you follow them precisely, you will be rewarded by the wonderful impact the music can have on the organist. If you intend to practice this piece, check out my practice score of the Prelude and Fugue in C Major, BWV 553. It has complete fingering and pedaling so you could start practice immediately. By the way, do you want to learn to play the King of Instruments - the pipe organ? If so, download my FREE video guide: "How to Master Any Organ Composition" in which I will show you my EXACT steps, techniques, and methods that I use to practice, learn and master any piece of organ music. In this article, I would like to discuss the matter of finding the main principle how to practice and master any organ piece. If you know this principle, or secret, or method, you will have no difficulty in applying it to many different compositions regardless of the level of difficulty. If you practice but without being aware of this secret, then the chances to succeed are not as high.
Everyone wants to have the main method of practice so that it could be applied to various pieces. I think, the secret to this is simple: analyze the piece and practice in smaller units. I will give one example here. Let us imagine that we take a new and unfamiliar composition. How do we start to practice it? I think, it is a good idea to get familiar with the piece and sight-read it in a slow tempo. As we play it through, we have to try to notice a few things here. First, look at the form or the structure of the piece. How the piece is put together? Look especially for repetitions because they help us to perceive the form of the composition. Once we know the form of the piece, next step would be to analyze the tonal structure of it. Here try to look for cadences and answer the question what keys or tonalities are used in the piece. Once we know the tonal plan, try to think how the new keys are related to the starting key. For example, if the starting or the home key is C Major and the new key would be G Major that means that the relationship between the home key and the new key is a 5th scale degree or the Dominant. Now, if you have analyzed the piece and know the form and tonal structure of it, you can start practicing the music. Try to remember how many mistakes did you make when you first played it. If the entire piece was too difficult and we made more than 3 mistakes, then we have to practice in smaller units. It could be a fragment of 1 line, or 1-4 measures. Sometimes even that is too much and we are still making too many mistakes. In this case, we could play each voice separately of that fragment only quite slowly so that we avoid making mistakes. Later, play 2 voices combined. The next step would be combination of 3 voices. And only then we could attempt playing all parts together. Of course, later we have to play in larger units as well (1 line, 2 lines, 4 lines, 1 page, 2 pages etc.). If we practice smaller fragments first, this will become natural and easy. In other words, we will be ready to play a larger episode. By practicing this way, you can master any organ composition. By the way, do you want to learn to play the King of Instruments - the pipe organ? If so, download my FREE video guide: "How to Master Any Organ Composition" in which I will show you my EXACT steps, techniques, and methods that I use to practice, learn and master any piece of organ music. Because the pipe organ is the most complex of all musical instruments, it is only natural, that the art of organ playing is very complex. It is easy for the beginner to be overwhelmed by the various details, such as articulation, registration, correct notes, rhythms, fingering and pedaling. However, very first thing an aspiring organist must do is to learn the correct manner of posture and sitting on the organ bench.
So, how do you sit on the bench? We sit in the middle of the organ bench. The height of the bench should be such that your feet should be slightly touching the pedal board. Not pressing the pedals, but hovering. Put the bench in a position exactly in parallel with the keyboards. I have seen people position the bench in such a way that its left side is farther from the keyboards than the right side. They claim this is more comfortable because the right foot does most of the work with the swell pedal. This is not correct. If you put the bench in this position, then when you sit, your body is positioned not straight but stretched to the left side. Over time, this type of sitting may cause problems for the body. So it is best if the organ bench is in parallel with the keyboards. The distance of the bench from the keyboards should be such that your toes should almost be touching the sharp keys. By the way, this is very useful if you want to hit the right notes on the pedal board. If your feet touch the edges of the sharp keys, you will feel the arrangement of the sharp keys in groups of two and three. The empty spaces between B flat and C sharp and D sharp and F sharp will show you exactly where the white keys B and C, and E and F are located. This helps in getting to know the pedal board. When you sit on the bench, try to keep your back straight, shoulders down and relaxed, breath normally. Your arms should be positioned close to the body. However, it is not uncommon for people with some piano experience to keep their arms stretched out to the sides a little. Although this position might work on the piano, it is not really correct on the organ. It is so because many pieces for the piano involve large leaps for both hands. Therefore, the arms may not be close to the body and they must be ready to jump. But with organ music the leaps are mostly done from manual to manual. Consequently, the elbows must be close to the body. By the way, do you want to learn to play the King of Instruments - the pipe organ? If so, download my FREE video guide: "How to Master Any Organ Composition" here: http://www.organduo.lt/organ-tutorial.html I often get asked what kind of organ shoes does one need to play the pedals? Can you play the organ with your street shoes, tennis, or running shoes? Or perhaps we can play the pedals without any shoes at all?
For an organist, this question is quite important. Correct organ shoes can help you to develop a better pedal technique. In some cases, the shoes can even determine whether or not some particular pedal line can be played or not. The correct organ shoes should have a fairly narrow tip, so that you could play just one pedal key at a time. A very flat tip would give you some trouble in hitting the right notes. The soles and the heels should be made from leather so that you could slide from key to key, if necessary. The heels should be about 1 1/4 inch (or about 3 cm) high for the optimum toe/heel technique. Women's shoes are best with stretch band with buckle. It is not uncommon for women organists to use higher than 1 1/4 inch heels for organ playing. There are numerous stories about famous French women organists who can play virtuoso pedal lines with high and narrow heels. How can they manage that I have trouble imagining. Whether you order professionally made organ shoes, or just find the similar ones in your closet, DO NOT play with shoes you walk on the street, running shoes, tennis shoes etc. I've seen some people just use their street shoes for organ playing, but I don't recommend that for these reasons: First, it is very important that the dirt from the street would not stick to the pedals. It can even make some damage to the construction and mechanics of the pedal board. Second, if you use just regular street shoes, the heel might not be with the right height which in turn might make your pedal technique develop incorrectly. By the way, I know some organists who play the organ without shoes at all... It might seem strange, but they use thicker socks so that their feet will not get cold, especially in the winter. They claim that direct contact with the pedals is the best. But of course they can't take advantage of the heels which make playing toe/heel technique quite difficult. At any rate, it is better just to take your street shoes off and play without them until you find the right ones you will use specifically for organ playing. Often organists use dancers shoes for organ playing which usually works well for pedal playing. So, where you can find the right organ shoes? If you want to get suitable organ shoes you can take a look at these shoes for women and men. By the way, do you want to learn to play the King of Instruments - the pipe organ? If so, download my FREE video guide: "How to Master Any Organ Composition" in which I will show you my EXACT steps, techniques, and methods that I use to practice, learn and master any piece of organ music. Many of my organ students ask me what is the secret to a perfect pedal technique? They want to know how they can achieve the ability to play intricate pedal lines, pedal scales, arpeggios, even chords with their feet with confidence and precision.
I always tell them that it is quite simple. Right from the beginning you have to use pedal preparation. Just as with finger preparation, this technique helps to prevent mistakes in the pedal line. Moreover, it gives you the feeling of confidence. In other words, if you use pedal preparation, very soon you will know without looking at the pedal board where any given note is. The way we use pedal preparation quite straightforward. When you have finished playing one note with the left foot, slide it right away to the next note of the same foot. Don't press it yet, but wait for its turn. The same is done with the right foot. This movement should be done with one quick, precise, and clear motion of the foot. Note that I use the word "slide", not "lift". when you slide, then your foot is touching the pedal board. This is very important: keep your feet in contact with the pedal board at all times. Although this technique is quite simple, I know that in reality not too many people use it. Very often they practice the pedal line, or an entire piece of music without even thinking about pedal preparation. This is largely because of laziness. It is easier to play the piece of music a few times through without giving attention to such detail, as pedal preparation. It such case, an organists may just go though the motions, their technique may not improve much. On the opposite, if we practice and don't pay attention to details, then we continually form bad habits. In other words, if we practice this way, we may never achieve the same level of superb pedal technique that masters have. I've seen high level organists who constantly use pedal preparation even be able to play in very fast tempo and their feet arrive to the desired pedal key just a moment before they have to play it. Believe me, both the view and the sound of such performance was very exciting, stable, solid, and confident. The good news is that you really have to think about pedal preparation only for some months. Later, you will form a good habit of playing the correct way. Your feet will instinctively move to the next position instantly. By the way, if you want to perfect your pedal technique, check out my Pedal Virtuoso Master Course - a 12 week training program designed to help you develop an unbeatable pedal technique while working only 15 minutes a day practicing pedal scales and arpeggios in all keys. When we listen to organ playing of real high level experts, we often marvel at how they can play without a single mistake. It seems like their music can be released directly to a CD recording. Moreover, these people can play flawlessly for hours.
Although there are a number of important reasons why real masters can play without mistakes, one technique which will help to achieve that is finger preparation. Although very powerful, finger preparation is quite often overlooked and many people forget to take advantage of it. It seems so insignificant that they don't pay any attention to it. The way finger preparation works is very simple. Your fingers should be in position for the next note right after they have finished playing the previous note. In other words, when you release the note, you have to be aware what the next note for this finger will be. For example, when playing the scale passage, we use thumb under technique. To play the ascending C Major scale with the right we use 123 12345 fingering. This means that the note C should be played with the thumb, D - with the index finger, E - with the middle finger, F - again with the thumb, G - with the index finger, A - with the middle finger, B - with the ring finger, and C - with the little finger or pinky. To apply the finger preparation technique for this passage, move you thumb in a position for F right when it finishes to play C. And the moment you release the E, your all five fingers should be prepared to play F, G, A, B, and C. This is a very simple passage, of course. For more involved episodes, we have to think about the best ways to use finger preparation. In addition, this technique is very useful for large leaps. It helps to prevent mistakes which otherwise may occur. When you encounter a large leap in the part of one hand, after finishing the previous note, try to move it right away to the position after the leap. This motion should be not circular but straight because it is the most efficient. If you practice this movement at least ten times, then it will begin to be very efficient. At first, you will have to constantly keep your attention to this technique for several months at least. Later, however, if you insist on using finger preparation, it will become automatic and you will not need to think about it. By the way, do you want to learn to play the King of Instruments - the pipe organ? If so, download my FREE video guide: "How to Master Any Organ Composition" in which I will show you my EXACT steps, techniques, and methods that I use to practice, learn and master any piece of organ music. Pedal playing is perhaps one of the most exciting aspects of organ playing. Everyone wants to start playing those flashy virtuoso pedal lines of Bach's d minor toccata, a large North German Baroque style Prelude or the Flight of the Bumblebee.
But, of course, we don't start pedal playing with such virtuoso music. We keep it really simple at the beginning, just a few long sustained notes played with alternate toes only. Just as with manual playing, the very first thing you have to learn when playing the pedals is how to depress and release the pedal keys correctly. So, what is the correct way to do that? The normal way we depress the pedals is through the light, swift, and precise motion of the ankle. In this case, the ankle serves as a fulcrum. As with manual playing, do not lift your feet from the pedal board. Keep the feet in contact with the pedal board at all times. This is really important. Always feel the surface of the pedals with your feet. In fact, the way we sit on the bench already helps to do that. The height of the bench should be adjusted so that your feet should be touching the pedals lightly. Not pressing, of course, but touching. If you lift your feet off the pedals in the air and let them hanging there, then there will be a couple of problems. First, very quickly you will feel some tension in your legs. You see, to let the feet be relaxed and touching the pedals is easier than to lift them. Therefore, this tension, which arises from the incorrect motion of the leg gradually will begin to form an incorrect habit and technique. Second, as with finger work, the releases will not be precise and clear which in turn will lead to the imprecision of the rhythms in the music. On the other hand, if you keep your feet in contact with the pedals, you will coordinate the releases much easier. Your pedal technique will be much more precise. Another thing to keep in mind is that the pedal should be pressed with the inside of the foot. This can be achieved, if we keep both the heels and the knees together. For smaller intervals, up to a fifth, you will have no problems playing this way. However, for large intervals, of an octave and others, it will not be possible to keep the heels together. It this case, just keep the knees together. By the way, do you want to learn to play the King of Instruments - the pipe organ? If so, download my FREE video guide: "How to Master Any Organ Composition" in which I will show you my EXACT steps, techniques, and methods that I use to practice, learn and master any piece of organ music. When I teach my organ students, one of the most apparent things I notice right away is whether or not their depression and release of keys is correct. If they come to the organ with some experience with the piano playing, then naturally they try to recreate the same feeling on the organ.
The thing is, although both the organ and piano have the same keys (black and white, sometimes white and black), their action and sound production is inherently different. On the piano it is quite natural to lift high the fingers and attack the keys with some force if you want to play louder, or with less force if you want the piano to sound softer. All of this is unnecessary on the organ because the instrument does not react the same way the piano does. For instance, whether or not you play stronger or softer, the organ will sound the same. This is not entirely true in some cases, but in order not to complicate things too much right from the beginning, let's stay with the most obvious feature - the dynamics on the organ is done differently from the piano. So, how do you depress and release the keys on the organ correctly? Well, it's quite simple. With one crisp and precise motion of the finger, press the key down and hold it until you have to release it. Do not make any unnecessary movements with the arm or had while holding the key depressed. Any circle motion that we do on the piano is not really needed on the organ. Of course, we have to be always aware if there is any tension in the shoulders, or the arms, or the hand, the wrist etc. If there is, just try to relax it. Conscious deep breathing while playing helps to achieve that. If you want to release the key, do not lift the finger from the key. Let it stay and rest on the keyboard. Remember, the less movement you do on the organ, the more precise your playing will be. In this way you will be able to control and coordinate the releases much better. So, the main thing to keep in mind here is: KEEP THE FINGERS IN CONTACT WITH THE KEYS AT ALL TIMES. If you come to the organ from the piano, it will be quite difficult to do it at first. You will have to think constantly about it. However, after some months of correct practice, you will form a good habit and never have to think about it again. By the way, do you want to learn to play the King of Instruments - the pipe organ? If so, download my FREE video guide: "How to Master Any Organ Composition" in which I will show you my EXACT steps, techniques, and methods that I use to practice, learn and master any piece of organ music. |
 DON'T MISS A THING! FREE UPDATES BY EMAIL.
 Photo by Edgaras Kurauskas Photo by Edgaras Kurauskas
Authors
Drs. Vidas Pinkevicius and Ausra Motuzaite-Pinkeviciene Organists of Vilnius University , creators of Secrets of Organ Playing. Our Hauptwerk Setup:

Categories
All
Archives
July 2024
|
 RSS Feed